The assigned task was to make one 3 1/2 octave marimba and one bass marimba along with assorted miscellaneous homemade percussion instruments at Stewart Middle School with the help of four classes of students from grades 3 - 10. The Summer Arts enrichment program for the gifted and talented in Augusta County provided the funding for the project. These marimbas were designed by Jon Madin, author of the books: Marimba Music 1 and 2 and (Wacky Music Instruments). The students worked on the marimbas, tuning the bars, stringing and nailing the frame and working on J pipes, circle shakers, and bottle drums for 3 days and part of the 4th day. The rest of the 4th day was spent learning several of Jon Madin’s marimba pieces in preparation for the “Festival of Tropical Delights” on the final day of the program. The goal of the week’s activities was to let the students make the marimbas and then have the chance to learn to play them.
Some Pictures:

The Process:
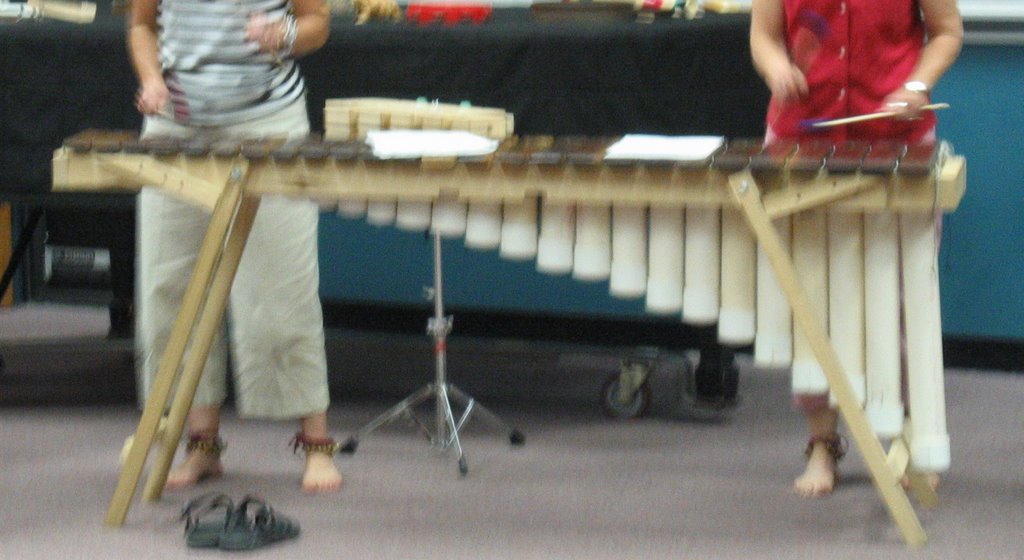
An essential part of the project was to hire a professional carpenter to do the complicated task of measuring and cutting each tone bar to the required length, thickness and width. Our carpenter also adapted and built the frame as well as the tube resonators. I chose to make marimbas with tube resonators which turned out to be quite a bit more difficult that I had anticipated. Each tube had to be cut and tuned, a process that added more than a few hours on my part to project. In Madin’s book there are also plans for a simpler box resonated instrument that also plays very well and may well have been a better choice for this workshop.
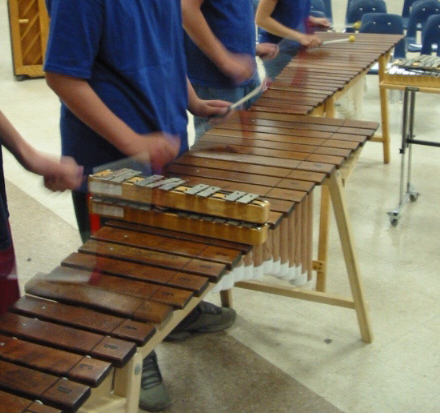
The students were able to tune the bars with hammer and chisel and get them reasonably close to the correct tuning. In order to have a playable instrument, however, I found that most of the bars needed some fine tuning in order to make a nice sound. The students took to their task with great enthusiasm. I had them go off in groups of two with each pair working on one bar. As they worked they would go to the electronic tuner and check the tuning of the bar. I helped them determine how far they had to go and where to cut next and off they went to finish the bar. As they finished, I asked them to sign the bar with a “sharpie.” After signing off they went to the finished frame and found the correct place for it and mounted it. It was great fun to watch the marimbas slowly grow into complete instruments. Of course, the students played the new bars to see what they would sound like, which only added to their desire to finish the instruments and “get to the music.”
Younger students in third and fourth grades were not asked to use the hammers and chisels but were able to sand the bars and paste the temporary letter name labels on each one. These students had a wonderful time making J-pipes, circle shakers, and bottle drums. J-pipes are measured lengths of 4” corrugated drain pipe, bent in a J shape and tied so that when you hit the crook with a stick it makes a nice “boing” sound. We made J-pipes tuned to C and A to play with our ensembles. Circle shakers are also made of 2” corrugated drain pipe in shorter lengths joined in a circular shape and filled about half full with lentils. These were used for various tossing games and dances while the marimba ensemble played. Bottle drums are simply used 5 gallon blue plastic drinking water bottles donated by a local Water Supply Company. We bought a few new ones from them for $5 apiece. All of these instruments were decorated with colored electrical tape and streamers making quite a colorful display. Of course the young students were allowed to play the marimbas as well but they were most proud of the instruments they built.
The Cost:
All of these instruments were built with materials available at local hardware and auto parts stores. We used cherry wood for the marimba bars and white pine for the frames. The bass resonator tubes were made from thin walled 4” PVC pipe and the marimba tubes from thick walled 2 1/2” PVC. Using the thick walled pipe was a mistake as we found that the frame was not long enough to accommodate the thickness of the pipe. More long hours were spent trimming the pipes by hand to narrow them enough to fit under the bars. We will use thin walled pipe next time! For mallets we used 3/4 “ dowel with shock absorber bushings for mallet heads. I used American Drum bass bar mallets for the bass marimba although there are suggestions for homemade mallets in Madin’s book.
2 comments:
Did the costs of the marimbas include the hiring of the carpenter? Or were these justthe material costs?
We used a carpenter to facilitate the workshop. The school system paid him a stipend. Yes, the cost of the marimbas included his stipend.
Typically in a Madin-style marimba making party, there are parents or school staff who are skilled in woodwork that can help make the marimba frames.
I made another set of marimbas in 2002 using a more traditional after-school approach. In this case I ordered the frame and cutting the tone bars from a local cabinet shop and the cost was $150.00. The remaining materials were only $50.00. I lucked out with the wooden bars because I found a local homeowner that had just re-done her floors with cherry. She had a lot of raw wood left over and donated it to the school. Buying hardwood in this case would have increased the cost.
Post a Comment